Rust Base Building Guide: Tool Cupboards, Upkeep and Raid-Resistant Design
How Rust building grades, the tool cupboard, upkeep and decay work, plus airlocks, honeycombing and soft sides for bases that are harder to raid.
In Rust, your base is your save file. Everything you gather, craft and loot ends up in boxes inside it, and every other player on the server knows that. A base that is cheap to break into will be broken into, often while you are offline. A base that is too large for your group will either rot away through decay or drain all your resources in upkeep.
Building and raiding have been at the center of Rust since it entered Steam early access in December 2013, through its full release in February 2018 and the console versions that followed. Good Rust building is a balance between protection, cost and time.This guide explains the systems underneath every base, from building grades to the tool cupboard and upkeep, and then the design ideas that make raiders think twice: airlocks, honeycombing and protecting your soft sides. If you are still on the beach with a rock and a torch, start with our Rust beginner’s guide first.
Building Basics: Plans, Hammers and Grades
All construction in Rust starts with two tools. The Building Plan, crafted from 20 wood and known by default, places structural pieces such as foundations, walls, floors, doorways, stairs and roofs. Right-click while holding it to choose the piece. The Hammer upgrades and repairs those pieces and offers extra options such as rotating certain pieces.

Every piece is first placed in its weakest form, twig, and then upgraded. The grades, from weakest to strongest, are:
| Grade | Upgrade material | Typical role |
|---|---|---|
| Twig | Wood | Temporary placement only; breaks almost instantly |
| Wood | Wood | Very first starter base; vulnerable to fire and melee |
| Stone | Stone | Standard grade for most bases |
| Sheet Metal | Metal fragments | Key walls and core rooms once you are established |
| Armored | High quality metal | The strongest grade, for loot rooms and vital points |
Exact upgrade costs and health values are shown in the game’s upgrade menu and have shifted over Rust’s long update history, so check them in-game rather than relying on old charts. The principle is constant: each grade is much stronger than the last and costs a rarer material. A common progression is to place twig, immediately upgrade to wood or stone, and later re-upgrade the most important walls to sheet metal or armored.
Never leave twig standing. It exists only as a placement step, and anyone can knock it down with almost anything.
The Tool Cupboard and Building Privilege
The tool cupboard, or TC, is the heart of every base. According to Facepunch’s official Rust wiki, it costs 1,000 wood, and every base needs one. It does two jobs: it stops other players from building on and around your base, and it prevents your base from decaying.
Building privilege
When you place a TC, you are automatically authorized on it. Authorized players can build, pick up deployables and use traps safely inside the cupboard’s area. Others must press the use key on the TC to authorize, which is why you should lock it. Any authorized player can deauthorize themselves, and anyone with access can clear the whole list.
The important detail many new players miss: the official wiki explains that the privilege area is projected by the foundations connected to the TC, not by the cupboard’s position. Its shape follows your building’s footprint. When you are inside it, a “BUILDING PRIVILEGE” notice appears near your health bar, and walking around your base is the easiest way to find its edges.
Building blocked
If you are not authorized, you see “BUILDING BLOCKED” and cannot place most items. The wiki notes two exceptions: unauthorized players can still place twig floors and wooden ladders. Raiders use ladders to climb onto roofs, so do not assume your roof is unreachable.
Separate buildings
Each separate structure needs its own TC unless it connects by foundations. Many players also build external TCs: tiny structures containing only a cupboard, placed outside the main base. They extend privilege over the surrounding area, protect high external walls that fall outside the main radius, and stop enemies from building right next to your walls to climb over them.
Upkeep and Decay
Rust bases do not last forever by default. Without upkeep, they decay.
Upkeep is paid from the TC’s own inventory. You store building materials inside it, and the cupboard consumes a fraction of the materials your base is made of. Opening the TC shows the cost per 24 hours and how long your base is currently protected. According to the official wiki:
- Walls, foundations, ceilings, roofs, doors and windows count toward upkeep. Deployables inside the base, like sleeping bags, do not.
- You pay in the materials your base uses. An all-stone base with sheet metal doors costs only stone and metal fragments.
- Without a stocked TC, decay begins immediately.
- When decay starts, outer layers go first and the damage works its way inward.
- If only one material runs out, only the parts built of that material decay.
The wiki gives approximate times from running out of a material to a piece being fully destroyed by decay: about 1 hour for twig, 3 hours for wood, 5 hours for stone, 8 hours for sheet metal and 12 hours for armored.
Upkeep cost grows with your base. Every extra wall and foundation costs a little more each day, so a sprawling base can become a resource sink. This connects directly to the wipe schedule: on a server that wipes weekly, a modest compact base often makes more sense than a giant fortress, as our guide to Rust wipes explains.
The TC as a raid deterrent
The wiki describes a grief-protection rule: if a TC is destroyed while holding resources, it consumes up to 24 hours of upkeep and protects the base for 24 hours from that point. In practice, raiders usually want to reach and control the TC rather than simply destroy it, which is why its placement matters so much.
Doors, Locks and Airlocks
Doors
Doors are a base’s most obvious weak point. Wooden doors are cheap but weak; sheet metal doors are the standard upgrade; garage doors cover wide openings; and armored doors are the strongest. Upgrade your doors at the same time as your walls. A stone base with wooden doors invites raiders straight through the front.
Locks
Every door, the TC and important boxes should be locked. The Key Lock is cheap but can be picked up by anyone who gets your key. The Code Lock, which the official wiki lists at 100 metal fragments, uses a four-digit code and is the standard choice. Change codes if a teammate leaves your group.
Airlocks
Facepunch’s building terminology page defines an airlock as two or more opposing doors within a single foundation that must be opened to enter or exit. The point is that the inner door stays shut while the outer one is open, so a player who follows you in, or shoots you at the door, cannot run straight into your loot rooms. Airlocks can also provide windows or gaps for watching and shooting at the area outside your entrance.
The wiki also distinguishes “smart” airlocks, which force you to close a door at least once to pass through, from normal airlocks, which only require opening the doors. Smart designs are harder to exploit if you forget to close a door behind you.
Raid-Resistant Design: Honeycomb, Soft Sides and Layout
No base is unraidable. The goal is to make raiding yours more expensive and time-consuming than raiding someone else’s.
Honeycombing
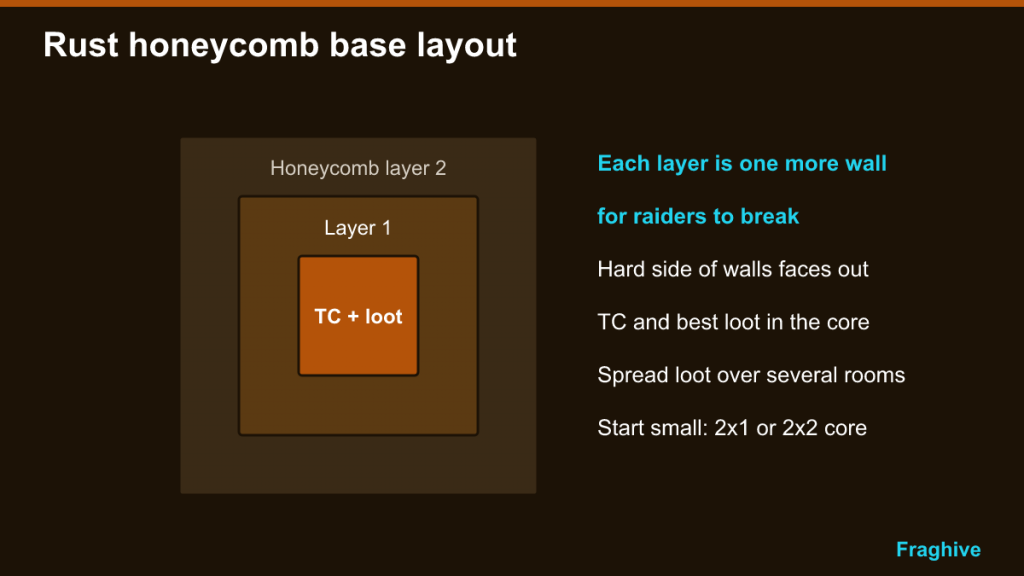
The official wiki defines honeycombing as layering walls, horizontally or vertically, so that raiding through that side costs more. Instead of one wall between the outside and your loot, raiders must break through two, three or more. Honeycomb rooms are typically empty triangular or square cells around the core. Each extra layer adds upkeep, so expand the honeycomb gradually as your resources grow.
Soft sides
Building pieces have a “hard” side and a “soft” side. The soft side, the inner face that points into your base when built correctly, is much more vulnerable to melee tools than the hard side. Raiders without explosives look for exposed soft sides, which is why wall orientation matters:
- Place walls so their hard side faces outward. The game shows which side is which while placing.
- Be careful with walls placed from outside the base or on exposed upper floors.
- Check the underside of floors and ceilings where they extend beyond your walls.
Protect the core
Put the TC and your best loot in the center of the base, behind the most layers. Spread loot into several rooms rather than one, so a successful raid does not take everything. A popular approach is to make the path to the TC the hardest route in the base, since the TC controls building privilege for the raiders as well.
Footprint and growth
The wiki calls the layout of your foundations your footprint. A compact footprint is cheaper to upkeep and easier to defend. Many experienced players start with a small 2×1 or 2×2 core that can later be wrapped in honeycomb, rather than a large but thin structure.
A Simple Building Plan for a Small Group
- Day one: Place a small twig footprint near resources but away from busy roads and monuments. Upgrade it to wood or stone, add a doorway and door, place the TC inside and lock it.
- Stock the TC: Keep at least a day of upkeep in it from the start.
- Add an airlock: As soon as you can afford a second door, turn the entrance into an airlock.
- Upgrade to stone everywhere: Then replace wooden doors with sheet metal doors.
- Add honeycomb and an external TC: Once the core is secure, layer the walls around the loot and TC rooms and protect your surroundings.
- Upgrade the core: Sheet metal or armored walls around the TC and loot room are the best use of rare materials.
Common Base-Building Mistakes
Building too big
A big base looks impressive but costs more upkeep and has more walls to defend. Build for your group size and the wipe length.
Leaving the TC unlocked or near a wall
An unlocked TC lets anyone who enters take over building privilege. A TC directly behind one outer wall is a raider’s shortcut.
Forgetting upkeep before logging off
Check the protection timer whenever you leave. Decay works whether you are online or not.
Ignoring the roof
Raiders can place ladders even inside your building privilege. Lock roof access and avoid exposed hatches.
For a wider look at where Rust’s harsh PvP sits next to friendlier games such as Valheim and Minecraft, see our survival game comparison.