Minecraft for Beginners: Surviving Your First Night and First Week
A step-by-step Minecraft Survival start: wood and tools, a shelter before dark, food, beds and spawn points, and the tool tiers from wood to diamond.
The first time you load a Minecraft Survival world, the game tells you almost nothing. You stand in a field with empty hands, the sun is already moving, and in about ten real minutes the first zombies will start to appear. This guide turns those first minutes, and the rest of your first in-game week, into a simple plan. Everything here works in both Java Edition and Bedrock Edition; where the two behave differently, we point it out.
How time works: why the first night matters
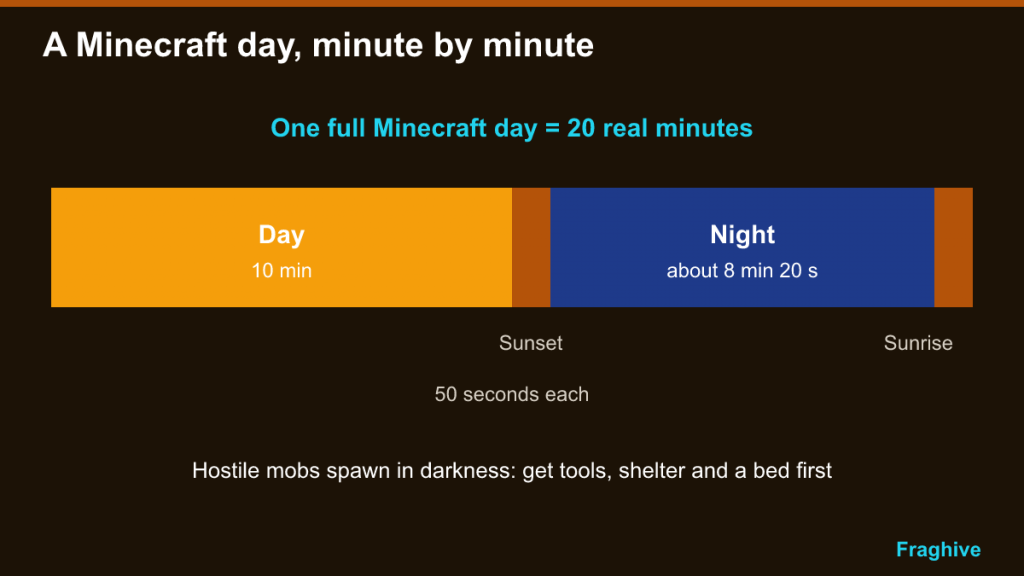
A full Minecraft day lasts 20 real minutes. According to the Minecraft Wiki, daytime is 10 minutes long, sunset and sunrise each last 50 seconds, and night lasts about 8 minutes and 20 seconds. Hostile monsters spawn on the surface in darkness, so as night falls zombies, skeletons, spiders and creepers begin to appear around you.
That gives you a clear deadline. In your first ten minutes you want three things: basic tools, some kind of shelter, and ideally a bed. Food can wait a little, but not too long.
Minutes 0–3: wood, planks and a crafting table
Walk up to a tree and hold the attack button on a trunk block. Punching works on logs; it is slow but enough. Collect at least a handful of logs, and more if you can. Then open your inventory, which contains a small 2×2 crafting grid.
- Turn logs into wooden planks in the 2×2 grid.
- Use four planks to make a crafting table, and place it on the ground.
- Craft sticks from planks. Sticks are the handles for every tool.
The crafting table opens a 3×3 grid, which most recipes need. The first things to make are a wooden pickaxe and, optionally, a wooden axe to speed up chopping. Do not bother making a full set of wooden tools; you will replace them within minutes.
Minutes 3–7: stone tools and a furnace
Stone cannot be collected without a pickaxe, which is why the wooden pickaxe comes first. Find exposed stone on a hillside or dig down a few blocks (never straight down beneath your own feet; dig a staircase so you cannot fall into a cave or lava). Mined stone becomes cobblestone.
With cobblestone and sticks you can make a stone pickaxe, stone axe and stone sword. Stone tools are faster and last longer than wood, and the stone pickaxe can mine iron ore. Collect extra cobblestone, because it also makes a furnace for smelting ore and cooking food, and it is a decent emergency building block.
Keep an eye out for coal (black-speckled stone) while you dig. Coal plus a stick makes torches, and coal fuels your furnace. If you cannot find coal, burn logs in a furnace to make charcoal, which does the same job.
Minutes 7–10: shelter before dark
Your first shelter does not need to be pretty. It needs walls on every side, a roof, a door or a block to close the entrance, and light inside. Options, from fastest to nicest:
- Dig into a hillside. Tunnel a few blocks in, seal the entrance behind you, and place a torch.
- A dirt or cobblestone hut. A small box two blocks tall with a roof works perfectly.
- A wooden cabin. If you gathered plenty of wood, planks look better and a wooden door is cheap to craft.
Light matters because monsters spawn in darkness. A torch or two inside keeps your shelter safe, and torches around the outside reduce spawns near your door.
Beds and spawn points
A bed is the single most valuable item of your first day. It needs three wool (from sheep) and three planks. Sleeping in a bed at night skips to morning, which means you avoid most of the danger. In multiplayer, sleeping only skips the night if enough players are asleep, depending on the server’s settings.
Using a bed also sets your respawn point. When you die in Survival, you drop your inventory where you fell and reappear at your spawn point. Without a bed you go back to the original world spawn, which could be a long walk from your base. Set your spawn as soon as you place a bed. If you find a village, its beds can be used at night too, but avoid attacking villagers; doing so makes trades more expensive, and on any difficulty above Peaceful the village’s iron golem may turn on you.
You can sleep from roughly the moment night begins. During a thunderstorm you can sleep even during the day, because storms are dark enough for monsters to spawn.
Food and the hunger bar
You start with 20 health points (ten hearts) and a full hunger bar. Health regenerates when your hunger bar is well filled, so eating is how you heal. If hunger drops to 6 points or below you cannot sprint, and if it hits zero you start losing health: on Easy you stop at five hearts, on Normal at half a heart, and on Hard you can starve to death.
Good early food sources:
- Farm animals: pigs, cows, sheep and chickens drop meat. Cook it in a furnace or on a campfire; cooked meat restores far more hunger than raw.
- Apples: occasionally drop from oak and dark oak leaves.
- Crops: breaking tall grass can drop wheat seeds. Plant them on tilled soil near water and you will have bread within a few days.
Avoid relying on rotten flesh from zombies except in emergencies; it can give you the Hunger effect.
Nights 1–3: what to do while it is dark
If you do not have a bed, the first night is a good time to mine. Dig a staircase tunnel down from inside your shelter, gathering stone and coal. Light the tunnel with torches as you go. This keeps you productive and safely away from the surface mobs.
Know the main threats:
- Zombies walk toward you and attack in melee. They burn in sunlight unless protected by a helmet or shade.
- Skeletons shoot arrows from range and also burn in daylight. Use cover and close the distance.
- Spiders can climb walls. They are hostile in darkness but neutral in bright light.
- Creepers silently approach and explode, damaging you and your buildings. If you hear a hiss, back away fast.
- Endermen are neutral unless you look directly at them. Avoid eye contact early on.
Days 3–7: iron, armor and the tool tiers
Once you are fed and sheltered, the goal is iron. Iron ore appears in stone, often visible on cave walls. Mine it with a stone pickaxe, smelt it in a furnace, and you get iron ingots, which unlock:
- An iron pickaxe, which can mine diamond ore
- Iron armor (helmet, chestplate, leggings and boots)
- A shield (one iron ingot plus planks), excellent against skeletons and creepers
- A bucket, useful for water and for safely handling lava
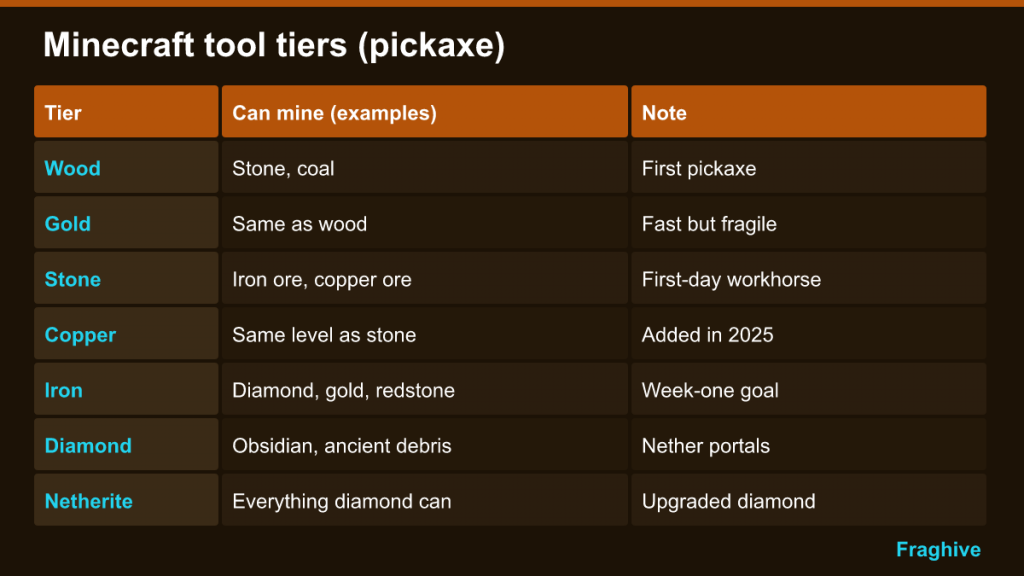
The Minecraft Wiki lists seven tool tiers. In mining terms the progression is:
| Tier | What its pickaxe can mine (examples) | Notes |
|---|---|---|
| Wood | Stone, coal | Your first pickaxe; replace it quickly |
| Gold | Same as wood | Very fast but fragile; not a real upgrade for mining |
| Stone | Iron ore, copper ore | The workhorse of your first day |
| Copper | Same level as stone | Added in 2025 (Java 1.21.9) |
| Iron | Diamond ore, gold ore, redstone | Your main goal for the first week |
| Diamond | Obsidian, ancient debris | Needed for Nether portals and netherite |
| Netherite | Everything diamond can | Upgraded from diamond gear with materials from the Nether |
Diamonds are found deep underground. Do not rush them in your first week; full iron gear, a shield and a reliable food supply will keep you alive far better than a single diamond pickaxe.
Difficulty settings explained
Minecraft has four difficulty levels, and you can change them in the settings of a normal Survival world:
- Peaceful: hostile mobs do not spawn and hunger does not drain. Ideal for learning to build or exploring calmly.
- Easy: monsters spawn but deal less damage, and starvation cannot kill you.
- Normal: the standard experience.
- Hard: monsters hit harder and starvation can be fatal.
Hardcore is a separate mode that locks the difficulty to Hard and gives you only one life. Save it for when you are confident.
A realistic goal for the end of week one
By your seventh in-game day (a little over two hours of real play), a comfortable target looks like this:
- A lit, enclosed base with a bed, crafting table, two furnaces and several chests
- A small wheat farm and a pen of animals you can breed for food
- Full iron armor, an iron sword, an iron pickaxe and a shield
- A safe staircase or tunnel down to a good mining level
- A stack of torches and spare cobblestone for emergencies
Hit those marks and you are ready for longer expeditions into caves and, eventually, the Nether.
Common first-week mistakes
- Digging straight down. You can fall into a cave, a ravine or lava. Always dig in a staircase.
- Wandering too far without a bed. If you die far from base without a spawn point, your items may despawn before you return.
- Forgetting torches. Dark rooms inside your own base can spawn monsters.
- Fighting creepers at close range. Hit and step back, or use a shield.
- Ignoring food. A starving player cannot regenerate health. Start a wheat farm on day two.
Minecraft rewards patience. Survive the first night, make your base a little better each day, and by the end of your first week you will have iron gear, a farm and a full chest of supplies. If you are curious how survival games compare with the other genre we cover, our battle royale explainer shows how a very different kind of survival plays out in a single 20-minute match.